Search

Cache Addressing -2

The address that the CPU sends for a read or a write operation is the address of the main memory. But before accessing the main memory the cache is checked to find if the contents of the main memory for that block have been stored in the cache or not.

Let us assume a Main memory of 32 blocks, which will need 5 bits to address, and a cache memory of 8 blocks which will need 3 bits to address.


Every block of cache that stores the data also has a field called as the tag filed which holds the MSB of the address of the main memory block which it maps to.


The processor sends a 5 bit address of the main memory for a read operation.  Let us say 10110.

This address is split into two parts  "index" and the "tag".

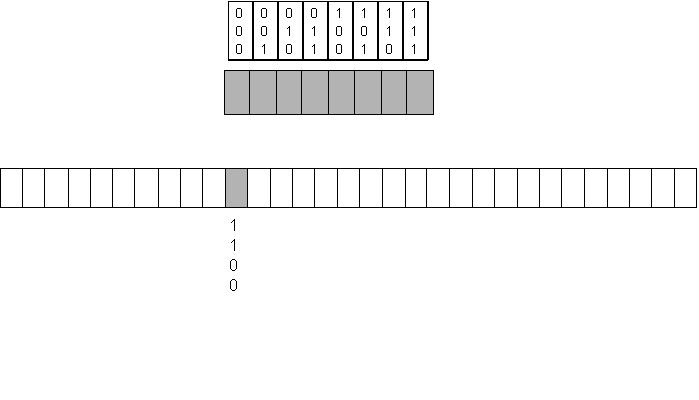
Index is the LSB 3 bits , i.e. the n number of bits required to address the cache. These 3 bits point to the block in the cache where data of this memory might reside.

Next the remaining 2 MSB bits are compared with the "tag" field present in the block number of the cache. If the MSB bits match with the tag field of the cache then the data available in the cache is of the main memory block which the processor wants to read.
In our eg  Index field is 101  .
The tag field is 10
If the tag field of cache block also has 10 then it is a cache hit, else it is a cache miss.  and the  data will have to be moved into the cache from the main memory.

The same is depicted in the figure below.

The above figure shows the working in case of a direct mapped cache. In case of a set associative cache the tags of all the blocks in the cache will have to be compared, and if it matches in any of them then it is a hit.
The Index becomes the set number instead of the block number. The same is depicted in the figure below.


In the case of a fully associative cache as there exits no mapping rule, the cache stores with each block the address of the main memory to which it is mapped to and to figure out if the required memory location is present in the cache or not the whole address needs to be compared, in other words the tag value in the cache value for a fully associative cache is the whole address of the main memory to which it is mapped to. The Working of a fully associative cache is shown below.


 The choice of cache mapping affects the number of hits and number of misses. In different scenarios different techniques turn out to he better, with direct mapping being the most rigid of all and the fully associative being the most flexible.


Cache Addressing

In the introduction to cache we saw the need for the cache memory and some understood some important terminologies related to it.
The next question is how is a block found in the cache, the cache memory is always smaller than main memory so how is it decided as to which block of memory can be placed where in the cache, and when the processor tries to read/write to a memory location how is it decided whether the block is present in cache or not. These issues are addressed in this article, which is all about cache mapping.

Cache mapping as the name suggests deals with mapping the main memory locations/blocks to the cache blocks.

There are three main forms or mapping
1.Direct Mapping
2.Fully associative Mapping
3. Set associative Mapping.

To get an understanding of these various mapping techniques let us take and example.
Let us assume a system with a main memory of 32 blocks and a cache memory of 8 blocks.
The addresses of main memory blocks range from 0000 to 11111.
The addresses of cache memory blocks range from 000 to 111.

Direct mapping :

In direct mapping every block in the main memory can be placed in only one block in the cache memory. For eg block0 of main memory will always be placed in block0 of cache memory.
The decision as to which bock is placed where is taken based on the formula
(Block address in main memory ) mod (Number of blocks in cache)

For eg: The block number 20 of main memory in our example system can only be mapped to block number 4 in the cache because 20 % 8 = 4

The figure below depicts the mapping pictorially.
Fully Associative:


In the case of fully associative any block in main memory can be mapped to any block in the cache memory. That is there is no restriction on the mapping of the blocks.
For eg: The block1 of the main memory can be mapped to block0 or block1 or block2 .... or block7 any of them.
The figure below depicts the fully associative mapping


Set Associative :

The set associative is in between direct and full associative mapping. In this mapping the cache is divided into sets with each set consisting of same number of blocks. For eg in our example system we can split the 8 block cache into 4 sets with each set having 2 blocks.
Every block in the main memory will be mapped to one set. The block can be placed in any block with in the set. The mapping is arrived at using the formula
(Main memory block number/address ) mod (Number of sets in the cache ). 

For eg the block10 of the main memory in our example system will be mapped to set2 in the cache because
10%4 =2
The figure below shows the set associative mapping


If each set has "n" blocks then the cache is called n-way set associative, in out example each set had 2 blocks hence the cache will be called 2-way set associative.


The next question that arises now is how does the system figure out which cache block maps to which block in the main memory as it is evident that each cache block maps to multiple blocks in the main memory.

Change in uasage of Current Pointer (task_struct)

The current pointer which gives us information regarding the current process under execution during kernel programming has undergone a chagne after 2.6.20. Previously the way of accessing the various fields of the task_struct using current was to treat current as a pointer to the task_struct.
Thus if we wanted t access the current user id (for eg) we would use the syntax
current->uid

But this has chagned now and instead of using it as a pointer there are functions that return us the required value for eg : accessing user id has now become
 current_uid().

Creating an Ioctl command in linux

Ioctl which stand for Input Output control is a system call used in linux to implement system calls which are not be available in the kernel by default.

The major use of this is in case of handling some specific operations of a device for which the kernel does not have a system call by default. For eg: Ejecting the media from a "cd" drive.An ioctl command is implemented to give the eject system call to the cd drive.


Note: The following code is only valid for 2.6 kernels below 2.6.36.
For versions above 2.6.36 refer to the post "Implementing ioctl call for kernel versions above 2.6.36
To implement a new ioctl command we need to follow the following steps.
1. Define the ioctl code in a header file and include the same in the application as well as the module.
The definition is done as follows
#define "ioctl name" __IOX("magic number","command number","argument type")

where IOX can be :
"IO": If the command neither reads any data from the user nor writes any data to the userspace.
"IOW": If the commands needs to write some to the kernel space.
"IOR": If the command needs to read some thing from the kernel space.
"IOWR": If the command does both read as well as write from the user


The Magic Number is a unique number or character that will differentiate our set of ioctl calls from the other ioctl calls. some times the major number for the device is used here.

Command Number is the number that is assigned to the ioctl .It is this number that is used to differentiate the commands from one another .

The last is the type of data that will be written in case of __IOW or read in case of __IOR or both read as well as write in case of __IOWR. In the case of _IO we need not pass any thing.

2. Add the header file linux/ioctl.h to make use of the above mentioned calls.


Let us call the ioctl that we will create as "IOCTL_HELLO" , hence the header file , ioctl_basic.h, would be


3. The next step is to implement the ioctl call we defined in to the corresponding driver. First we will need to #include the header file ioctl_basic.h


Then we need to add the ioctl function which has the prototype


Where
ionde :is the inode number of the file being worked on
filp : is the file pointer to the file that was passed by the application.
cmd : is the ioctl command that was called from the user space.
arg : are the arguments passed from the user space.


With in the function "ioctl" we need to implement all the commands that we define in the header file.As we saw each command is given a command number in the header file, the same number will be used in a switch case statement to implement the calls.
We will just add a print statement to see how the ioctl call works. so the function would look as follows


In the above function the ioctl command "IOCTL_HELLO" will have got the number 0,that we assigned in the header file ioctl_basic.h, The same number would be passed in the argument "cmd" when the ioctl call is made from the user space. Thus using "cmd" in the switch case makes sure that the correct command get executed for the ioctl call.

4. Next step is to inform the kernel that the ioctl calls are implmented in the function "our_ioctl". This is done by making the fops pointer "ioctl" to point to "our_ioctl" as shown below


Note: You can read about fops at "fops implementation"


Now we need to call the new ioctl command from a user application, to test its working.

The call to an ioctl in the user space i.e in an application looks as follows


file descriptor : This the open file on which the ioctl command needs to be
executed, which would generally be device files
ioctl command : ioctl command which is implemented to achieve the desired functionality
arguments: The arguments that needs to be passed to the ioctl command.

Thus is our case the call would look as below

We need to "#include" the header file "ioctl_basic.h" in the user space program too.

The following are the full codes for the header file,the module and the user space application.

Header file: ioctl_basic.h


Module: ioctl_basic.c


User space appliction: user_basic_ioctl.c


Now compile the module using the following makefile


Note : To know more about compiling a module refer to "Inserting into the kernel" and "user access"


The message that was printed in the output of dmesg command is the same message that we have incorporated in the ioctl call implementation in the driver, hence proving that the call from the user space was passed on to the kernel space successfully.