Search

How to end all processes using kill

The kill command can be used to end all the processes that are running on the system in one shot.

Note: This is not the recommended way of killing the processes, please use it only when needed.

Note that this will kill the gdm too causing a logout of the system . The gdm will restart itself

The options to be passed to kill to end all the processes are -1 -9 i.e.


Using qemu to debug kernel

The qemu when used in the system mode can be used to run a complete operating system in another. For e.g. if we want to test a kernel image compiled for ARM on the x86 we can do it using the qemu in system mode

Another use of qemu is to debug or single step through the kernel code to debug it or to just understand the code.

To be able to debug the kernel running inside the qemu we will first need to have a kernel that is compiled with debug info, i.e. the option CONFIG_DEBUG_INFO should be set which can.be done as follows:

Download the source code from kernel.org
Create default config using


Launch the configuration menu using


Now go to option kernel hacking and select the option compile kernel with debug info

Note: You will require package ncurses-devel to be installed .

If menuconfig does not launch then you cna open the .config file using any editor and search for CONFIG_DEBUG_INFO and set it to y
Now run :


If there are no errors the bzimage would have got generated in arch/x86/boot under the source tree which we compiled.

Now let us boot this kernel using qemu and see how we can debug it. To just run the newly compiled kernel we can use the command


But to be able to debug the we will have to add the following options :

S: to ask the qemu to stop as soon as it starts,so that we can single execute when we are ready with the gdb connection s: to inform qemu to wait for HSBC connection on port 1234 kernel: To point to the bzimage that we wish to boot. The command with the options will be:


After executing the command,a qemu window is launched,which stops booting because of the S option.We can see the message stopped written in the top title bar of qemu.

Now open a new terminal and launch gdb passing to it the vmlinux that got created as a result of the kernel compilation


The gdb will read the debugging symbols that have got compiled with the kernel from vmlinux thus help us in debugging the kernel.

Now we need to connect this gdb session with the qemu session launched previously, which can be done by using the following command in gdb prompt


This connects the gdb to the qemu.
To set a breakpoint for a kernel function use the command break in the gdb prompt. For eg


This will set a break point for the function kernel_init
To start execution of qemu use the command c which stands for continue.

The other gdb commands and their working can be found in the post "Introduction to gdb" .

To stop debugging use the command quit in gdb, which will also kill the qemu session.


Generating assembly ops and micro ops in qemu

The QEMU emulator is able to exectue code written for on archiecture on another by converting the assembly code from one architecture to another.

QEMU does this by converting the guest code to some thing called as TCG(Tiny code generator) ops or micro ops, which is nothing but each instrution of the guest code coverted to an intermediate set of code, which when compiled by the host compiler generates the assembly code for the host.

In the post "Executing ARM executable on x86" we saw how we can execute the ARM binary on x86 to see how the above steps are carried out internally we can print the assembly code at each step and comapre them

To generated the assembly code of the guest, while executing the binary using the command "qemu-arm" pass the option -d in_asm

Note: To see how to generate an excutable for arm see the post "Executing arm executable on x86".


This will generate the input assembly code, that is the guest assebly code . By default the output is place in /tmp/qemu.log , we can save it in a file for later comaprisions.


To see the TCG ops/micro ops , pass the option -d op


To see the assembly code generated for the host that is x86 pass the option
-d out_asm . The output again by default goes to /tmp/qemu.log


Thus we can see the input guest code, the intermediate microps as well as the output assembly of the host os using the qemu.

To see all of the three at the same time we can use the split command of the vi editor. The detials of using split can be found in the post Splitting window in the vi eidtor.

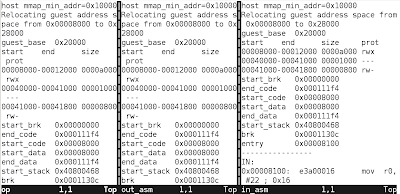
The following is a screenshot of the three files being viewed simultaneously in the vi editor.


Executing arm executable in x86 using qemu

QEMU is an emulator capable of emulating a number of processors, enabling the code written for one architecture to run on another. It works in two modes

1. Use mode : In which only applications written for one architecture can be executed on another. For e.g. an application written for ARM can be executed on an x86 machine.

2. System mode: In which a complete Operating system compiled for an architecture can be run on another. For e.g. a kernel compiled for ARM can be booted on an X86 machine.

In this post we will see how to work with the user mode of the QEMU by executing an ARM executable on an x86 machine (any normal desktop or laptop are x86 systmes).
Before starting to work with QEMU we will have to install it, which can be done from the package manager.
In Debian based systems :


Or we can download the source from qemu and compile it from source. While compiling make sure that the target "ARM" and "x86" both are selected.

To confirm if the installation has happened properly, open a terminal and execute the command


To generate an arm executable we will also need the cross compiler for arm, which can be downloaded from "gnuarm" or compiled using the script in this post script to download and compile gnuarm

Now let us write a simple program in c, to print hello world:

hello.c


compile this using the arm cross compiler


To verify the file type of executable generated you can use the command file


Now try running the "hello" executable directly on the x86 system.


The error indicates that the executable is not supported by the architecture of the system.

Now let us try running the same using qemu


qemu-arm is able to execute the ARM executable successfully on x86 machine.
This enables us to write and test code of any architecture on usual x86 systems and then port only the final code on to the real system.


Linus being named as laureate 2012

The creator of Linux, Linus Torvalds has been chosen for the Millennium Technology Prize by the Technology Academy of Finland.

Linus created Linux as a hobby project in 1991 and shared it for free over the FUNET network to enable development by others. The kernel soon caught interest and people started to pool in for its development. In 1992 the kernel was released under the GNU/GPL and it has not looked backed from then on.

Today people across the globe participate in developing the kernel.Linux has always been the operating system of choice for servers and high security systems.

The same Linux kernel is also the core of the famous mobile Operating system "android".

Android, which has a wide install base on smart phones and tablets, has taken Linux to the next level in its usefulness and popularity.

Recognizing the huge contribution that android and hence Linux has had in improving the society and life of the people, the Technology Academy of Finland has nominated Linus Trovalds for the award.

He will be receiving the award on June 13 2012.

Source : http://news.cnet.com/8301-1001_3-57418602-92/torvalds-receives-2012-millennium-technology-prize/

History of Linux: http://en.wikipedia.org/wiki/History_of_Linux

Autobiography of Linus Torvalds: Just for Fun: The Story of an Accidental Revolutionary


Using the substitute command in VI editor

In this post we will see the various ways in which we can search and replace strings in the "vi" editor.

To search and replace in the vi editor we have to use the command "substitute" or the shorter option "s".

Please note that all the substitute commands give below have to run in the command mode of the editor.

We will use this test file for all the examples :


The syntax of the command is

[range]s/{search string}/{replace string}/[flags] [count]

range : specifies the lines in which the replacement has to be carried out, if left blank the current line is considered.
flags: Controls various othe features of the substitue,we will see a few options.
count: The count number of replacements are carried out in the file

Let use some examples to understand the working

Simple substitute in the current line :

Replacing only one occurence :

To replace a string only in the line the cursor is present at we can use

s/{search string}/{replace string}/

If we want to replace the word "is" with "was" in the first line of the example file then move the cursor to first line and execute the command :


As a result of this the first occurance of "is" in the line will be replaced by "was".

Replacing all the occurences:

If we want the same command to be applied to all the matching stings in the current line we will have to use the flag "g", which means global.


To be prompted before each replace:

If we want to be prompted for confirmation before replacing the string, we can use the flag "c".

The matched string will be highlighted an will be presented with the options


e.g.


To replace in the whole file:

To apply the same command to all the lines inthe file we will have to specify the range. The range is given in line numbers, so to specify the whole file we can use the range 1,$ which indicates starting from the first line till the end of the file, which is indicated by the symbol $ e.g.


Restricting to specific lines

The range can also be restricted to a specific line numbers by using the numbersin the range filed.
For eg if we want to replace the word linux with Linux in lines 2,3 and 4 we can pass the range 2,4 i.e.


Note: we can use the command :set number to find out the line numbers.

In built options:

The substitute commands also has few useful options for the search strings.
For e.g. the option "\u" converts the next character to upper case.


The above command searches for the string "linux".
The \0 points to the whole matched pattern i.e linux in this case.
Thus we are replacing linux with linux, but we have also added the \u option before \0, thus the next character after "\u" i.e. "l" in this case gets converted to upper case converting the string from "linux" to "Linux".

To convert first characters of all the lines to upper case :


To convert first letter of every word to upper case :


To look into more options of substitute look at the help in vi


Splitting window in VI editor

if we want to view more than one file at the same time in the same terminal, we can use the vi editor along with its command split

For e.g. let us say we have two files file1 and file2 that we want to view together in the same terminal then we can do it as follows.
1. Open a terminal and type


2. After file1 opens, go to the command mode and by pressing "esc".
3. Enter


As a result of this command we should see the terminal split into two halves, the top half displaying the file2 and the bottom half displaying the file1 as shown in the figure below.


By default the split of the terminal happens in the horizontal direction. In case we want to split the terminal in the vertical direction we can use the command vsplit instead of split and the files would look as shown below.


The window which has the cursor is indicated by highlighting corresponding file name . In the figure above we can see that the file2 is highlighted indicating that the cursor is present in the window of file2.

Cursor movement:
To move the cursor from on window to other
cntrl + w , up arrow to move to window above
cntrl + w , down arrow to move to window below
cntrl + w , right arrow to move to window on the right
cntrl + w , left arrow to move to window on the left
To quit
Move to the corresponding window using the cursor movement shown above and use the normal quit command :q
We can open as many windows as we wish using the split, the figure shows 4 files in 4 winodws being opened.

Control a system using gestures: Skeltrack

Most of us would have heard of the microsoft kinect, the gaming console which can be controlled by gestures. How about doing the same to out computers ?


Skeltrack is a cool open source solution that does just that.
Skeltrack ,combined with gnome , tracks a users movements allows him/her to click, drag drop, zoom in,zoom out etc just by gestures.


Controlling GNOME 3 and playing games with Skeltrack from Joaquim Rocha on Vimeo.


It might soon be time to bid adieu to the good old mouse.

Raspberry Pi launched.

Another feather on the cap of linux in embedded systems. 
The much awaited Raspberry Pi, an ARM based development board that comes preloaded with linux, has been launched.

With an unbelievable pricing of $35 its like a dream come true for the embedded enthusiasts. 

For those interested in detailed review of the board have, a look at this review by bit-tech.net 

Review of Raspberry pi

 And you can discover the current updates at 

http://www.raspberrypi.org/

Finding the user id of a user

Every user in linux is recognized by a unique user id. Here are a few ways you can find out the user id of a user.

1. Login as the user whose user id is to be found out
2. Open a terminal
3. Run the command


The number that will appear as the output is the user id of the currently logged in user.

If you want to know the user id of user with out logging in as that user .

The easiest way is mentioned in the first comment below (updating the blog after receiving the comment )

Another more round about way is to use the script shown below.

uid_script:


Save the script and give execute permissions.
Execute the script


output:


Various fields of ls -l (long listing)

The command "ls" with option "-l", also called as long listing, gives a lot of information about the files. Here is an animation that describes what each field in the long listing format signifies.

Making a terminal speak a message on opening

We saw how we can have the terminal display a message when opened in the post "Making a message appear on opening a terminal"

What if we want to have the terminal greet us with a voice message.

One of the ways to do that is a text to speech converter, for e.g. the utility espeak converts what ever text is passed to it into speech.

To be able to use this command, install the package "espeak". For debian based systems run the command


Now open a terminal and type


and the word hello will be spoken by an automated voice.

To have the terminal speak a message every time it is opened we just have to use the espeak command in ~/.bashrc file .

For e.g. to be greeted with a message "Hello" on opening a terminal

1. Open the file ~/.bashrc

2. At the end of the file add

3. Save the chages, close the file as well as the terminal.

4. Now open a new terminal and the message "Hello" should be heard as soon as the terminal opens.

Make a message appear on opening a terminal


Generally terminals open to the standard prompt, with no other frills with it. (Except in linux mint)


In case you want to change this and want a message to appear each time the terminal is opened then you can do it as shown below.


Open ~/.bashrc using an editor like gedit


At the end of this file add the message that you want to be shown each time the terminal is opened.


For e.g.


Now close the terminal,open a new one and the message should appear as the first thing on the screen of the terminal.


Making an executable available in all folders: export


There are situations when some executables or scripts are present in a certain forlder and we end up changing directory right up toll that folder every time to execute it. This is obviously not a very optimal way of doing it.


For e.g. let us say we have a script "hello.sh" in

/home/user/Desktop/temp/hello.sh


Every time we open the terminal, it opens in /home/user and to execute hello.sh we have to change directory to Desktop/temp.


To able to execute hello.sh from any folder in the system we will have to tell the system about the path where hello can be found.


The environment variable PATH stores the information regarding the various folders that the sytem looks into when we execute a command in the folder. Only if the executable is found in any of the folders listed in the PATH , the sytem is able to execute it successfully from any where in the system.


To look at what the value of PATH in your system is , run the command


Now to be able to execute hello from any where in the system, we need to add the the path to the folder containing hello.sh into $PATH.


This can be done using the export command as follows


Please note that the $PATH before ":" is very important as we only want to add the value of our
folder to $PATH and not replace the already existing values.


Now if we execute hello.sh from any folder it should work with out any problems. But an export  of this kind is valid only  in the terminal in which we execute the export command and only as long as the terminal is open. Once the terminal is closed and reopened, the value of $PATH is back to its default value.


To make sure that the value of $PATH stays updated every time a terminal is opened we can add the same command to the file   ~/.bashrc


This is file that every terminal looks into when it is launched and any command in this file gets executed before the terminal starts working.


Thus open ~/.bashrc in any editor and add the same export command that we executed above at the end of the file and save it.


Now close and reopen the terminal and you should be able to execute hello.sh form any where.
Note: hello.sh should have execute permissions


Script to download and compile gnuarm toolchain

Here is a script that will download and compile the gnuarm tool chain. The script by default compiles toolchain version 4.0.0 but you can modify the same by choosing the right options after launching the script.

The script will fail if the "url" for the source changes are gnuarm.com .

The script has been tested on debian 6.0 , gcc version 4.4.5.

It creates the "arm-elf-" executable in a sub directory called toolchain with it directory from whre the script is launched toolchain.sh

working with screen

If we start process from the command line in a terminal, when the terminal is closed the process also gets killed.

For e.g. let us try to open the gedit editor from the terminal


This will launch the editor, allowing us to wrok on the editor. Now if we close the terminal from where we ran the command, the editor also closes with it.

But there might be situations when we want the processes to keep running evern after the terminal is closed. This can be achieved by using the command screen, screen not only allows us to continue with the process even after the terminal is closed it also allows to attach another session of the screen to the process and regain control over it.

Let us see how to do this with an example.

Open a terminal and type the command screen

Note: If screen not installed in the system we will have to download it using the pacakge manager. In debian based systems we can run the command.


to install screen.

The command displays the version of the screen and other related information, hit enter to get back to the terminal. The new terminal that is presented to you is the terminal of the screen command. Let us open an editor in this new terminal


Once the editor has launched, we can close the terminal from which we launched the editor, unlike the previous case the editor will not get closed with the terminal this time. Next we need to regain control over the gedit process, this can be done in a new session of screen.

Open a new terminal and run the command


The string "2627.pts-0.user" gives us the information regarding a process which was running in a screen but has been detached in our case it is the gedit process. The first number "2627" is the pid, the second "pts-0" is the terminal number and the third "user" is the host who launched the process.

Thus if you have more than one process which was launched in different screens and have got detached all of them will get listed as a result of the above command and we can recognize the process we are intersted in by looking at the pid.

To reattach the process run the command


Now you should have new terminal with the same command "gedit temp" in it.

Thus any process can be dettached and attached to a screen with out stopping it.
Script to print the RAM size

Here is a script that prints the RAM size of a system using the information from /proc/cpuinfo . I couldn't come across a command that gives only the ram size info in a user friendly way, hence wrote this to make it easier to view only the RAM size.

ramsize.sh: Save the script as ramsize.sh,give it execute permission using chmod and execute the script as follows.

It gives the output in MB.

no rule to make target ../include/ansidecl.h required by regex.o


If you are compiling gnuarm and hit the error


Most probably this is because you have not followed the instructions for building exactly. The instructions to build mention that we have to run configure and make steps in a separate directory for build and not in the source directroy itself, though it is not mentioned that not doing so might lead to failure of build.

Thus to get around the above error, create a directory let us say "builddir" in the source folder.

"cd" into the "builddir" and run configure from there by giving the relative or absolute path to the configure in the source directory, for eg if hte buildir is in source folder itself then


should work.

That should take care of the above error.

Download from gnuarm site keeps getting disrupted


The attempt to download the binary or the source of arm cross compiler from the site www.gnuarm.com/ keeps getting disrupted on my system.

Even if the size of the file is 30MB the download stops automatically after downloading 5 to 10MB and indicates that the download is complete.

I am not sure if the issue is with my network or something else, because the network seems to be uninterrupted. I tried different browsers too and still the same result.

The workaround that did work for me was to use "wget" command line tool .

Right click on the download link in the page and click on "copy link location"

Now open a terminal and go the folder where you want to save package.

Type

and hit enter.

This should more often than not be able to download the file, and even in case the connection does get closed before the download is complete you can continue it from where it got disrupted by passing the flag "-c" to wget i.e.


gnuarm: can not execute binary file

If you are using gnuarm cross compiler and get the following error while trying to compile using the gnuarm compiler :


This is most probably because you are using an executable meant for 64bit systems and your system is a 32 bit one and hence it is not comaptible with your system. All the binaries above 4.0 on the gnuarm are for 64bit systems, try downloading the lower ones and it should work fine.

For eg: on Debian 6.0 if I try to use gnuarm-4.0.1 it will throw the above mentioned error but gnuarm-3.4.3 works perfectly well.

But if you want the latest cross compiler for 32 bit systems, then download the source and compile it yourself on your 32bit system. The instructions for compilation is also given in the gnuarm site under the tab "support".