Search

Difference between semaphores and spinlocks

In the posts " " we were introduced to semaphores and spinlocks and how they can be used to protect the critical section. Though both are used for the same purpose, their working is completely different from each other. Here are the major differences between the two.

1) Spinlocks can only be used for mutual exclusion, that is it can allow only one process into the critical region at any given time.
In semaphores we can use it for either mutual exclusion or it can be used as counting semaphore to allow more than on process into the critical region.

2) In spinlocks a process waiting for lock will keep the processor busy by continuously polling for the lock.
In semaphores a process waiting for a semaphore will go into sleep to be woken up at a future time and then try for the lock again.

3) In spinlocks a process waiting for lock will instantly get access to critical region as the process will poll continuously fro the lock.
In semaphores the process waiting for a lock might not get into critical region as soon as the lock is free because the process would have gone to sleep and will enter the critical region only when it is waken up.

4) Spinlocks can have only two values LOCKED and UNLOCKED.
Semaphores if used as mutex will have value 1 or 0, but used as counting semaphore it can have different values.

5)Spinlocks are not very useful in uniprocessor systems as they will keep the processor busy while polling for the lock, thus disabling any other process from running.
Semaphores don't keep the processor busy while waiting for the lock thus, they can be conveniently used in a uniprocessor system

6) It is recommended to disable interrupts while holding a spinlock.
Semaphores can he locked with interrupts enabled.


Exctrating pages from a pdf document using gimp

Here is how we can use gimp to extract pages from a pdf file. Let us say we have a file named "make.pdf" with around 200 pages in it. If we need to extract the pages 10,11 from it.

We can either use the command line tool "pdftk" as shown in the post " " or we can use gimp as shown below. The big difference between the two being pdftk will extract them as pdf files itself, but gimp will extract them as images.

Launch gimp and click on


Browse to the file to be opened and click on open


Once the file is open ,gimp should launch a window as shown below. The various options available are


range: We can specify the range of pages that we wish to extract. For example if we wish to extract pages from page numbered 20 to 30 we can specify as 20-30. If the pages that we wish to extract are not in a continuous range we specify different page numbers separated by commas for example 2,4,6.

Open page as : The selected pages can be opened in one gimp document as different layers by selecting open pages as layers or we can create a gimp document for every page by selecting open pages as images. When extracting pages from a pdf, opening them as images seems like a better options as we can save each page separately. If we open it as layers then the pages will overlap each other and only the top page will be visible.

Then we can specify the width and height of the extracted pages and what resolution we want the pages to be in.

After specifying the above options as required, click on import.

If we have selected open pages as images, gimp will launch one document of every page extracted from the file as shown below.


We can save each of the documents separately in the desired format by clicking on


Note that the extracted pages will be images and we will be unable to copy any text from the files.


Answers to Quiz on chapter-3 of book Linux Device Drivers- 3rd Edition

Answers to the Quiz

1.In the output of "ls -l /dev" a character driver is identified by
Ans. Letter c in the second column

2. The argument macro MAJOR is of type
Ans. dev_t

3. Which of the following function is used for static allocation of major number to character driver
Ans. register_chrdev_region

4. The structure file_operations is a
Ans. Collection of function pointers

5.The structure "file" is defined in the header file
Ans. linux/fs.h

6.cdev_alloc returns a pointer to
Ans. struct cdev

7.If the file_operation implementation of read returns 0 it signifies
Ans. End of file

8. The arguments passed to "open" method in a device driver are
Ans. inode pointer and file pointer

9. inode structure is used by the kernel internally to represent
Ans. All files

10. We can find out the major number of a driver by looking at the file
Ans. /porc/devices


Quiz on chapter-3 of book Linux Device Drivers- 3rd Edition

Quiz on chapter-3 of book <a href="http://lwn.net/Kernel/LDD3/">ldd3</a>

  1. In the output of "ls -l /dev" a character driver is identified by

  2. Letter c in the second column
    Letters ch in the second column
    Letter c in the third column
    Letter p in the first column

  3. The argument macro MAJOR is of type

  4. int
    char
    dev
    dev_t

  5. Which of the following function is used for static allocation of major number to character driver

  6. register_char
    register_chrdev_region
    alloc_chrdev_region
    alloc_region

  7. The structure file_operations is a

  8. Collection of structure pointers
    Collection of function pointers
    Collection of macro pointers
    Collection of string pointers

  9. The structure "file" is defined in the header file

  10. linux/file.h
    linux/filesys.h
    linux/fs.h
    linux/sys.h

  11. cdev_alloc returns a pointer to

  12. struct cdev
    struct chardev
    struct dev
    struct device

  13. If the file_operation implementation of read returns 0 it signifies

  14. Empty file
    End of file
    No data in file
    Error in reading file

  15. The arguments passed to "open" method in a device driver are

  16. inode pointer and file pointer
    inode pointer and file_operations pointer
    file_operation pointer and file_pointer
    only file pointer

  17. inode structure is used by the kernel internally to represent

  18. Only open files
    Only closed files
    All files
    Running Processes

  19. We can find out the major number of a driver by looking at the file

  20. /proc/major
    /proc/devices
    /proc/modules
    /proc/numbers


Introduction to semaphores using animation

Semaphores can be defined as a tool to protect the access to a common resource while it is being accessed by multiple tasks or processes at the same time.

If the semaphore is used to allow access to the shared resource by only one process, then the semaphore is termed as a mutex or binary semaphore.

If the semaphore is used to allow access to the shared resource by more than one process, then the semaphore is termed as counting semaphore and the number of processes allowed to access the shared resource will depend on the initialization of the semaphore.

The basic functionality of semaphore is based on two operations or functions "signal" and "wait". Any process which needs access to a shared resource protected by a semaphore needs to call the function "wait" on the semaphore. If the semaphore is free then the process will be allowed to lock the semaphore and proceed to access the shared resource. On the other hand if the semaphore is already locked by another process then the new process will have to wait until the semaphore gets unlocked.
The piece of code which accesses the shared resource is generally termed as the critical region.

Any process holding a semaphore,when it is releasing the shared resource also has to release the semaphore by calling the function "signal" on that semaphore, thus enabling other functions waiting for the same semaphore to lock it and enter the critical section.

The internal working of a mutex, or binary semaphore is very simple. Every mutex is initially set to a integer value 1, which signifies that the mutex is in unlocked state. When a process calls the function wait on the mutex, the value of the semaphore is decremented by 1,thus making it 0. When the next process calls wait on the same mutex, the decrement of 1 from 0 will make the value negative, which will indicate to the process that the semaphore is not free and thus it can not enter the critical section. The process will increment the value back to 0 and then go into a wait or sleep state.

When a process calls the function signal on a mutex the value of the semaphore is incremented by 1, i.e. the value gets incremented to 1 from 0 making the semaphore available to other processes.

The following animation depicts the working of a binary semaphore.


In case of a counting semaphore the initial value of semaphore is set to the number of processes that are to be allowed into the critical section at the same time. If three processes need to be allowed into critical section then the initial value of semaphore will be set to three and each call of wait will decrement the value of semaphore by 1. Thus after three calls of wait, the value is semaphore would have reached 0 and any more calls to wait will make the number negative indicating the resource is busy.

Thus using semaphores we can successfully protect a critical section and restrict simultaneous access to a shared resource.

Introduction to critical section with animation

In modern operating systems, with support for multithreading and multiprocessor almost becoming default, it is common to come across the scenario where more than one process would try to access a resource simultaneously. The resource could be just a memory area or a hardware resource. Allowing access to a resource by multiple processes at the same time might not be recommended and the modern operating systems provide various tools to prevent such simultaneous access.

The piece of code which tries to access the shared resource is termed as the critical section of the program.

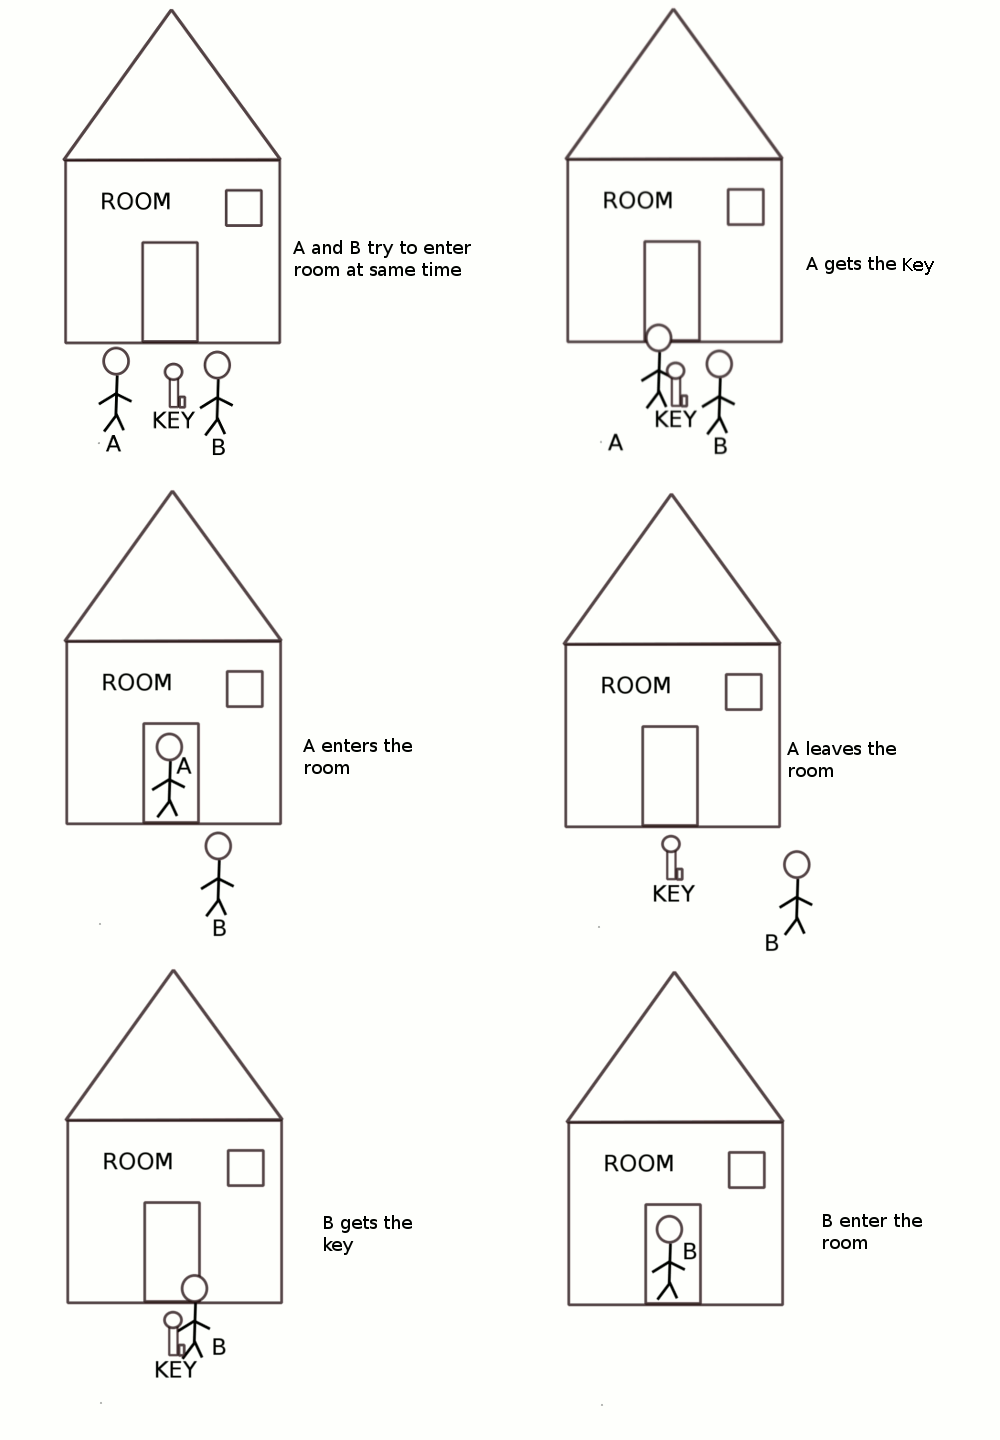
The following animation explains the concept of critical section using a general example.

Two people A and B want to enter into a room at the same time. But only one person is allowed into the room at any given time.To ensure that only one person is allowed, the room is locked and only the person with the key to the lock is allowed into the room.


Let us a say both A and B reach the entrance but A gets the key before B then A will be allowed into the room and B will have to wait till A does not exit the room and frees the key. Only after A exits can B get hold of the key and enter the room.

With respect to operating systems, the persons A and B were equivalent to two processes, the room was the shared resource. The key was the tool used to ensure only one process gets access to the resource at any given time.

Two of the common tools available in operating systems to prevent multiple access to a shared resource are

Adding antique border to imges using gimp

Using gimp we can make a photo look antique by adding the border to it like the older photos used to have.

Launch gimp, and open the photo to which the antique border is to be added using


Now click on


It will launch a menu as below


From the menu we can select


Click ok after entering the required values.

After gimp finishes its job, we should see the output as below.


The new image with the border can be saved in required format


Encrypting text files using VI editor

While creating text files using the "vi" editor we can make the files secure by encrypting the files with our own encryption key. Any encrypted file will be unreadable unless the coorect key is not known.

Let us say we have a file by the name temp:


To encrypt this file, so that no one with out the encryption keys is able to read or write from the file, open the file using vi editor


Now go to command mode by typing "esc"

Then type :X and press enter.


Note the "X" is in upper case

VI will now prompt for an encryption key as shown below.


Enter any key, and press enter

It will prompt for confirmation of the key, enter the same key again .


To find out whether the file is encrypted or not we can use the command file


Thus indicating that it is an encrypted file. If we try to read from the file using cat


The output will be junk value. If we try to open the file using "vi" editor, it will prompt us for the encryption key.

In case we entered the wrong key, the file will open but with garbage values in it, and it will be in read only mode.


Only on entering the correct key, the file be visible in the original form

To remove the encryption, open the file using "vi" editor by entering the correct key and go to the command mode. Use the command


And press enter. It will prompt for a value of key, hit enter, do not enter any value for the key.


The encryption should have been removed now and we can edit the file as usual way.