Search

Creating animated 2018 on the terminal

In the post "Creating 2018 on the terminal" we created 2018 on the terminal. Here is a small extension to the same, to make it appear on character at a time giving it the effect of an animation.


Save the script as animated_2017.sh and run it in the terminal


You should see 2017 appear one character at a time on the terminal.

Creating 2018 on the terminal

Here is a bash script which can be used to create the text 2018 on the terminal using any characher of your choice.


We have entered "&" as the character, and you should see the output as shown below.


There was error copying file to media... error splicing file.

While copying a large file into a pen drive or any other external storage system if you get the error


As shown in the image below.


The error is because FAT filesystem does not seem to support copying files which are too large. So to work around this problem you will have to make the pen drive into a NTFS file system. Which can be done easily using the command mkfs.ntfs

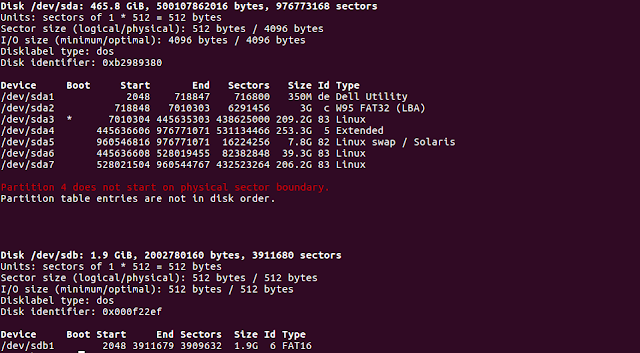
Connect the pendrive and find out the partition number using the command


From the list of partitions, note the partition number of the pen drive that has to be converted to NTFS. Be very careful cause of you use the wrong partition you will loose all the data in it. Let us assume the partition is /dev/sdb1

unmount the partition using umount


Now to convert it to ntfs


Creating NTFS partition might take some time depending on the size of the disk. Once the formatting is done, any file size can be copied into it.

Automatically kill scripts and commands after a certain duration

When running scripts, we might want to restrict the time for which a script runs. May be printing out the logs for 10 minutes and then stop automatically or stopping a script if it does not exit by itself. We can use the command time out for this .

Timeout command runs a command for a specific duration and kills the command after that duration if it has not exited by itself.

syntax:


Let us take the following script,test.sh, as an example


The script sleeps for 15 seconds and then prints the message done.

If we run the script with timeout of 5 seconds the message "done" will not get printed as the script will get killed before 15 seconds as shown below.


Running the script with out the timeout, we will see the message done being printed.


libvirt storage of saved vm states and changing the storage

libvirt allows us to use the virtual memory state to be restored later to start the machine from the saved state. The saving of the virtual machine state requires extra memory and the location or folder in which the state is saved is


For example if the virtual machine name is debian, when the vitual machine is saved it is saved as debian.save in the above mentioned folder. If the space avialable in this partition is not enough then we can make this folder to point to a different partition in which space is availble using the command ln. Let us say we have a paritition /media/disk1/virtual_machines use the ln command as follows

Thus helping use the memory in which ever partition is availble.

virt-install : ERROR the CPU is incompatible with host CPU: unknown host CPU


While installing operating system using the command virt-intsll or libvirt we might encounter the above error. The error might occur even if the cpu model is a popular one.

In some forums it is mentioned that this error could be because nx/xd feature of the CPU is not enabled, but some BIOS don't have this nx/xd feature at all making it very difficult to change or verify it.
The only work around that helped was using the cpu as "clear cpu configuration". That is while running the virt-install command pass the option "clear" for --cpu as shown below.


If you are using libvirt then the option is available under hardware details->processor as shown in the figure below.


Setting this option might help get around the error.


use isoinfo to find if an iso image is bootable

Using iso images for installation is a common practice. But some isos might fail to boot when we try to use them. One of the reasons could be that the iso is not a bootable iso. One way to verify if the iso is bootable or now is to use the isoinfo command in linux.

isoinfo is a command that provides a lot of information regarding an iso file.


To view the information about whether the iso is bootable or not use the option -d.


From the above output we can see that the iso has an Eltorito boot loader, thus it is a bootable iso. If the iso does not have a boot loader we would not see any boot loader information in the output of the above command.

We can also use the isoinfo command to list the contents of the iso usin the option -l


qemu : ram disk creation fails

While trying to boot a windows vmdk file from vmplayer/workstation using qemu using the command


The following error prevented the boot of windows


The workaround for this is which worked was using the -m option to increase the memory as shown below.


The windows should boot now.

Scilab blank plots in debian

If you are facing the problem of blank plot screen in scilab, here is a solution that worked for me.
The problem is probably because of a mesa library that needs to be updated. But the update of mesa library brok my GUI in debian 8. So the solution that works is to update the kernel too, to the latest version using backports.

Add the following repository to the file /etc/apt/sources.list


Update the package list


Search for the available linux-images using


See the latest kernel available, and install the same using the command


Reboot the system, and to verify if the latest kernel version is booted you can run the command


Open the synaptic package manager and search for mesa. If any updates are availane for the mesa related libraries, update the same. Now if you launch scilab or xcos the plots should appear properly.

Creating proc read and write entry (linux kernel 4.6)

In the post "Creating a read write proc entry in kernel versions above 3.10" we saw how to create a read and write proc entry in the kernel version 3.10 and above. There is a slight modification to creation of proc entries, and here is a code that has been tested in 4.6.

We can create a proc entry using the function


Where:

name: The name of the proc entry
mode: The access mode for proc entry
parent: The name of the parent directory under /proc
proc_fops: The structure in which the file operations for the proc entry will be created.

For example to create a proc entry by the name "hello" under /proc the above function will be defined are

For example to create a proc entry by the name "hello_write" under /proc the above function will be defined are


Now we need to create file_operations structure proc_fops in which we can map the read and write functions for the proc entry.


Next we need to add the functions read_proc and write_proc which will give write data to the proc entry and then read data from the proc entry.

The write function will recieve data from the user space using the function copy_from_user into a char pointer "msg".


Thus the write function will look as below.


Once data is written to the proc entry we can read from the proc entry using a read function, i.e tranfer data to the user space using the function copy_to_user function.

The read function can be as below.


The creation of proc entry and the intialization of the msg pointer can be done in a function create_new_proc_entry.


The create_new_proc_entry will be called in the init function.


The proc entry that was created will be removed in the exit function using remove_proc_entry.


Thus the full code for creating a write proc entry looks as below.

proc_rw.c


The makefile for the compilation of the modules are


Compile and load the module using


To test the proc entry let us first write data into the entry

Now we can read the data back


We can see that the message that we wrote into the proc entry, the same data is being displayed when it is read. The data will remain as long as it is not overwritten by new data.


Launch a terminal with random text color every time

We can set the color of the prompt using the print statement as given in the following link.

Using this info, we can create a script that will set the prompt to a random color every time we open or launch the console or terminal.


The variable $RANDOM will generate random numbers and "%" will ensure that the number will remain below 7, ensuring that the variable color will have only numbers between 30 and 37, which are the numbers of the console colors.

To make this piece of code run every time we open the terminal or console, we can add it to the file .bashrc of the user. So open the .bashrc and enter these two lines at the last and save it.

Remember, do not edit any thing in .bashrc unless you are not sure of what you are doing as it might make launching console difficult if you do wrong changes.


Create animated 2017 on the linux terminal

In the post " " we created 2017 on the terminal. Here is a small extention to the same, to make it appear on character at a time giving it the effect of an animation.


Save the script as animated_2017.sh and run it in the terminal

You should see 2017 appear one character at a time on the terminal.